A badly packed car creates work at exactly the wrong moment. You arrive with forty minutes of daylight, pull out three bags to reach the tent, move the cooler to find the stakes, and discover that dinner is underneath the bedding. Nothing is missing. Everything is simply in the way.
The fix is not a more elaborate organizer. Pack backward from the first hour at camp. The things you need first go in last, complete systems stay together, and no single object should hold the rest of the car hostage.
Write the arrival sequence before touching the trunk
Picture the first six jobs in order: park, check the site, pitch shelter, build the bed, make dinner, then find light and warm layers. Put those words on the packing list. They are a loading plan, not just a camp plan.
The tent, footprint if the tent uses one, poles, fly, stakes, and mallet form one arrival bundle. The sleeping pads, pumps, bedding, and sleep clothes form another. Friday dinner belongs in one marked bag near the kitchen bin. Headlamps, rain shells, work gloves, and the site confirmation stay where a person can reach them before a door full of gear is opened.
Anything intended for Saturday afternoon can sit deeper. The hammock, extra game, second-night pantry bag, and spare clothes are not allowed to block shelter or dinner. This one decision solves most trunk archaeology.
Build five zones
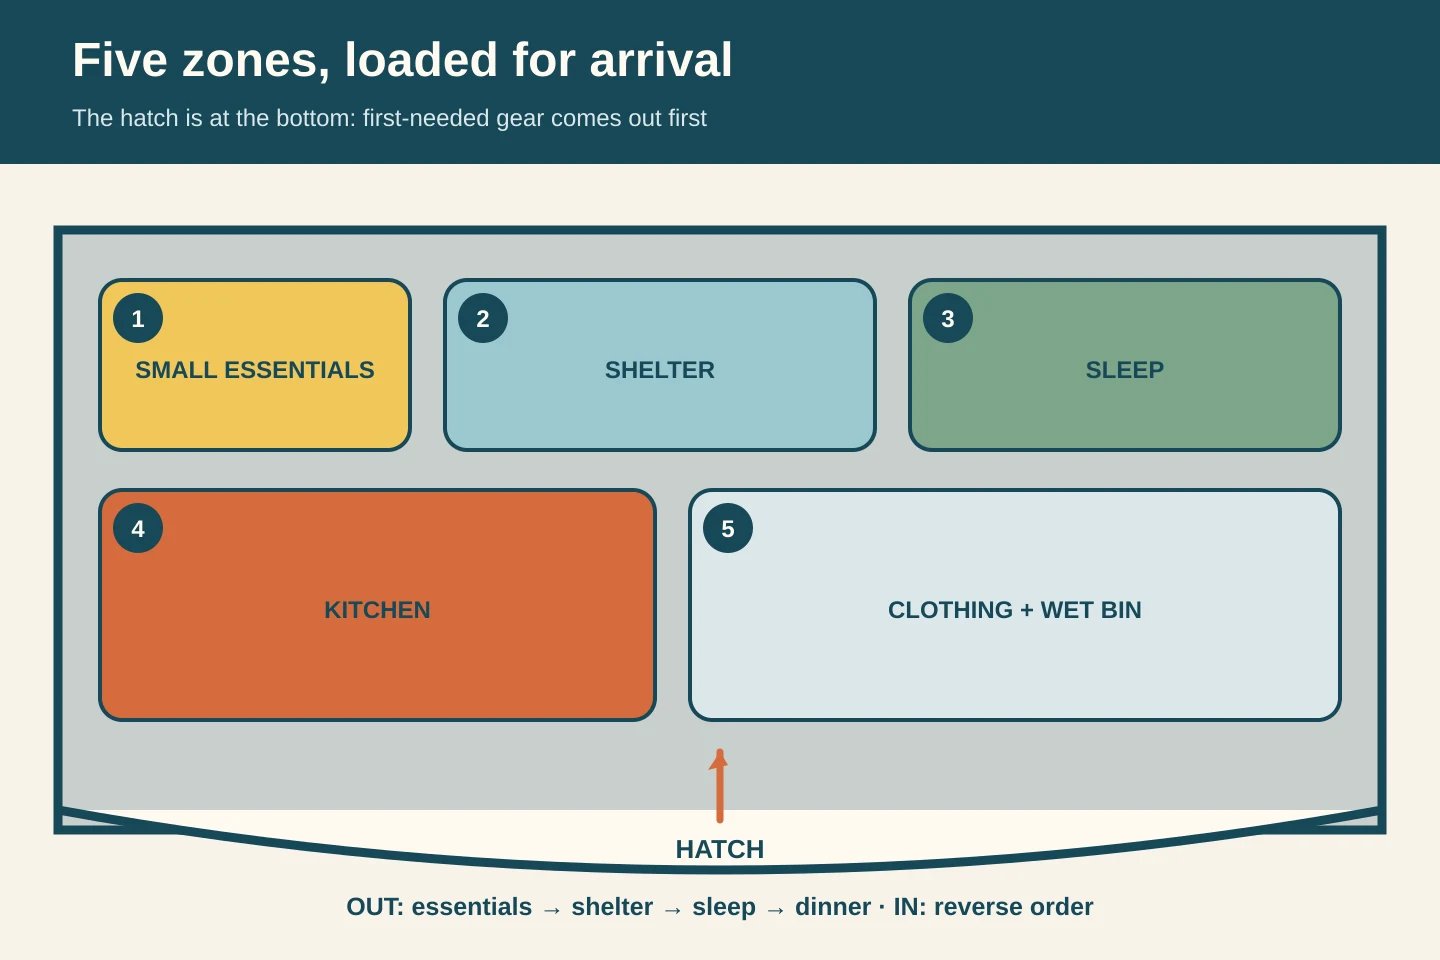
Give the cargo area five addresses: small essentials, shelter, sleep, kitchen, and clothing with a wet bin. Put every item into one zone and keep each system together.
Load in reverse arrival order. Dinner and sleep gear go in first; shelter and small essentials go nearest the hatch so rainwear, headlamps, site paperwork, and the tent emerge before bedding.
Load heavy, contained things low and secure
Keep dense bins and the cooler low, upright, and unable to slide into the hatch. Soft bedding can fill gaps, but it should not be the only thing preventing a stove or water jug from moving. Use the vehicle's cargo anchors when provided and follow its load and visibility guidance. Nothing should rise high enough to block the driver's rear view or become a loose projectile during a sudden stop.
Water containers need an upright, supported position with the spigot closed and facing away from fragile gear. Fuel travels according to its label and the vehicle and campground rules, protected from damage and separated from food. Do not use the tent bag as a retaining wall for something that can leak.
Before using a roof rack or box, read the vehicle, rack, crossbar, and box limits; the lowest published limit controls, and the rack itself counts toward it. Roof weight raises the center of gravity and can increase stopping distance and wind sensitivity. Distribute the load evenly, secure it to the approved attachment points, and recheck straps after the first few miles.
Do not leave fuel canisters in a hot closed vehicle or in direct sun. Follow the label during transport, protect valves from damage, separate fuel from food, and remove it to the permitted shaded storage location at camp.
Give the cooler its own door
The cooler gets opened on the road, at check-in, and at camp. Put it near a door or the hatch, not behind the tent. Pack food in reverse meal order so Friday dinner is on top and Sunday breakfast can remain cold and undisturbed below. Keep raw meat below ready-to-eat food in sealed containers, and use a thermometer when the menu needs a reliable cold chain.
A separate dry-food box prevents bread, coffee, and the cooking oil from competing with ice. Put the first meal, stove, pot, spoon, lighter, and two bowls within one reach of each other. If arriving late, dinner should be possible while the rest of the car remains packed.
At camp, the cooler, dry-food box, toiletries, pet food, and trash follow the exact overnight storage rule. Many developed campgrounds accept a closed, locked hard-sided vehicle; others require the food locker or another approved method. Check before arrival.
The final test is a ten-minute arrival
Close every bag and stand behind the loaded car. Without moving unrelated gear, can you reach the reservation, rainwear, headlamps, shelter bundle, sleeping-pad pump, and Friday dinner? If not, reload now. Ten minutes in a driveway is cheaper than forty minutes in rain.
Photograph the finished layout. On the trip home, use the same zones but give wet gear and trash their own contained locations. At home, note what was hard to reach and what never came out. The next packing plan should improve from evidence, not from buying a larger tote.
Pack the drive home as a wet trip
Give wet tents, tarps, muddy stakes, damp towels, trash, and leftover food separate leak-resistant locations before departure. Keep the driver's visibility and emergency kit intact, secure the changed load again, and unpack wet shelter and sleep gear immediately at home. The original zones can stay; what changes is which containers hold wet or dirty gear.
Sources and further reading
Image credits
Lead image: Obi / Unsplash · Unsplash License.